


Creating and Using SSH keys with PuTTY and WinSCP
Creating SSH key pairs | Copying the public key to your home area | Using the keys with PuTTY | Using the keys with WinSCP
What are SSH keys?
Data is encrypted and decrypted using keys. The longer the key, the more secure the encryption. If the same key can be used to both encrypt and decrypt data, this is known as a symmetric key. Using symmetric keys has inherent problems. The people or computer systems doing the encryption have the ability to decrypt your data too. The key could be stolen from them thus allowing your data to be read anywhere. For these reasons, it is best to use asymmetric keys.
When using asymmetric keys, you generate a pair of keys known as public and private keys. The public key can be used to encrypt data, but that data can only be decrypted using the private key. As their names imply, this means you can give the public key out to allow people to encrypt data for you and as long as you keep your private key to yourself, only you will be able to read it. The private key never leaves your computer and can itself be further protected by a passphrase so that even if your computer is stolen, your data is safe.
The SSH protocol allows you to use public and private keys for user authentication. The keys are generated on the client, not the server, and then the public key is copied to the appropriate servers that you wish to access. The private key remains on the client and allows only that client access.
Using keys for authentication gives a further level of security to SSH. If password access is disabled on the SSH server (e.g. your NetManager), then SSH connections to the server without a valid SSH key will be rejected.
Creating SSH key pairs
- PuTTY
Download and install the MSI ('Windows Installer') (you will probably want the 64-bit x86 one) from the Package files section at the PuTTY web site. Run the PuTTYgen program
WinSCPDownload and run WinSCP from the website. On the Login window, click on Tools and pick Run PuTTYgen
- At the bottom of the Window that appears ensure that the EdSDA key type is selected and check the curve is set to Ed25519 (255 bits)
- Click the Generate button in the middle section of the Window. You will now be asked to move the mouse around over the blank area of the window to create random code for your SSH key
- Change the Key comment from ed25519-key-YYYMMDD to your name or the name of your PC where the key will be saved (for easy identification later)
- Click on the button labelled Save private key and save the .ppk file somewhere on your harddisc (remember to keep this secure). If you wish, before saving you can protect it with a passphrase by entering your chosen passphrase in the Key passphrase and Confirm passphrase boxes (you will be warned if you have not a passphrase)
- Highlight all the text in the box labelled Public key for pasting into OpenSSH authorized_keys file and press Ctrl-C to copy it to the clipboard. Do not attempt to use the file created if you choose Save public key, as this is in the wrong format
- If you want to use your private key to authenticate yourself to another service (e.g. Remote Safeguard backups, your web-hosting account or a dedicated virtual server, then please email us your public key which you can paste into your email using Ctrl-V. You must never send us your private key
- If you wish to keep a copy of the public key, then open Notepad from your Start Menu
- Click into the Notepad window and press Ctrl-V to paste the text from the clipboard
- Save this file somewhere as filename authorized_keys
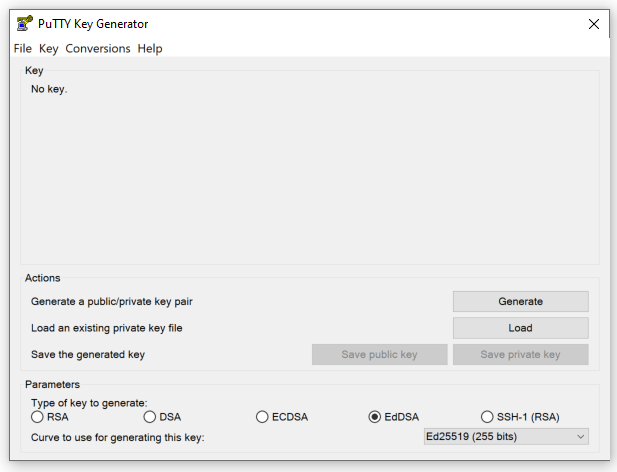
Figure 1:PuTTYgen configuration page
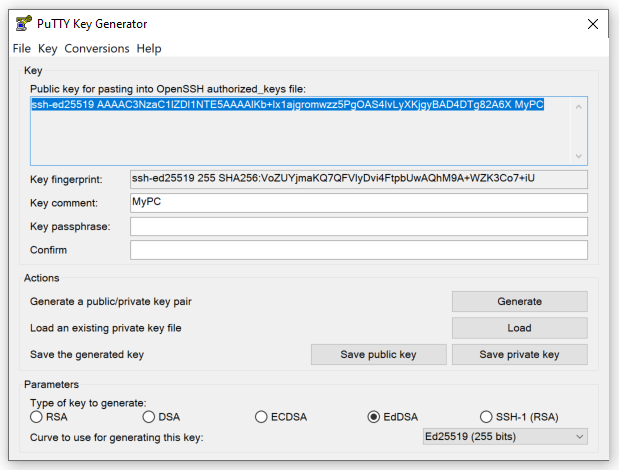
Figure 2:Example of an OpenSSH key (text highlighted)
Copying the public key to your home area on a NetManager
N.B. This section is only useful if you want to connect to NetManager as your own user account. You will need to ensure that your user account has SSH enabled, by default this will not be the case. If you want to enable password-less login as root, you will probably want to do this in a different way (e.g. email your private key to us or copy it to the correct location from the command line. How to do this is beyond the scope of this document.
The authorized_keys file created above needs copying to a directory called .ssh in your home area on the NetManager. You may need to create this directory. The simplest way to do this is to copy the file to your home area when you are next on site (we assume that you are generating these keys on your home computer). If you are using Windows to access your home area, it is possible that files and directories beginning with a full-stop will be hidden, so you may need to change your folder options to show hidden files.
If your home area is not held on NetManager, you can use scp to copy the public key onto the server. To do this, follow these instructions:
- Download and run the standalone version of WinSCP from the website.
- Type in the server name or IP address as well your username and password and click Login. If you are asked to confirm that you wish to Continue connecting to an unknown server and add its host key to a cache, click Yes
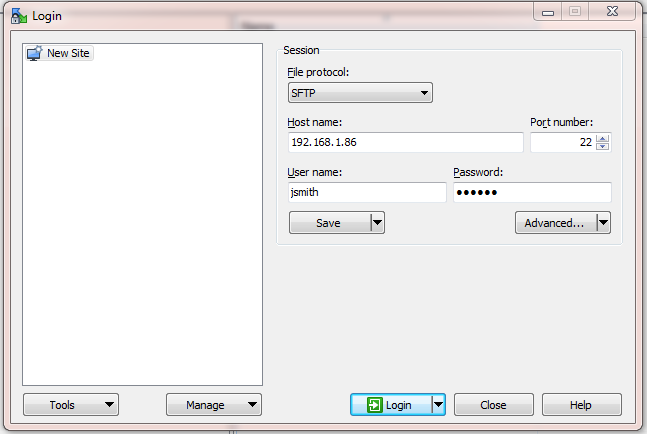
Figure 3:WinSCP logon page
- You will then see your home area on the destination NetManager. If you don't have a .ssh folder create one (Ctrl-D). Ideally its permissions should be as shown below:
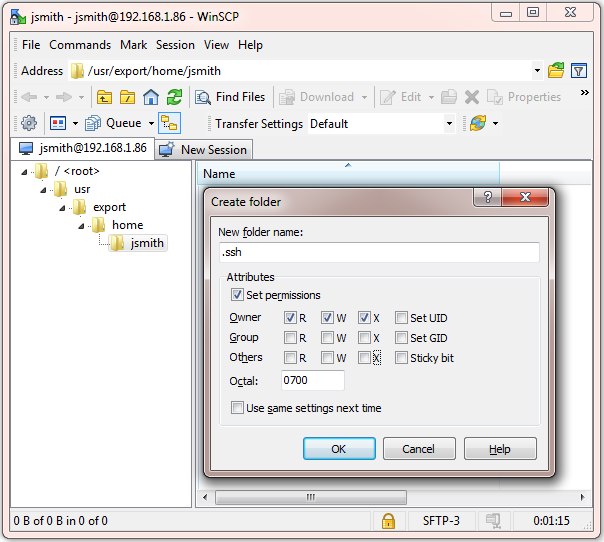
Figure 4:Creating a .ssh folder in your home area in WinSCP
- Browse to the .ssh folder and simply drag and drop your authorized_keys file into it (click Copy on the Copy window that appears). If the file is called authorized_keys.txt, please rename it once copied to authorized_keys (i.e. remove the .txt)
- If the key is for logging into a NetManager as root, you must name the file authorized_keys.local, not authorized_keys and ensure it is in root's home area (i.e. /root/.ssh. Next run the /usr/libexec/build/ssh build script. The reason behind this is that root's authorized_keys file gets rebuilt automatically (taking the contents of authorized_keys.local into account), so if you do not do this, your public key settings will be lost.
- Quit WinSCP
Using the keys with PuTTY
On your client machine as part of your SSH configuration, you can specify a private key to use. You will find this under the Connection >SSH >Auth section of the configuration page. Click on the browse button next to the box labelled Private key file for authentication and browse to the .ppk private key file you saved earlier.
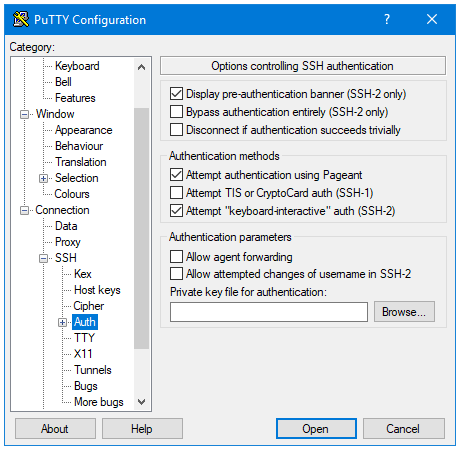
Figure 5:PuTTY authentication page
You can now configure any other options you want. When you have finished, return to the Session configuration section. In the Host Name (or IP address) box, enter username@servername_or_ip (e.g. for user test on server with IP address 1.2.3.4 you would specify test@1.2.3.4). To make things quicker next time, you can save your configuration by entering a name in the Saved Session box and clicking Save. In future, you can just double-click on its name in the bottom box to launch.
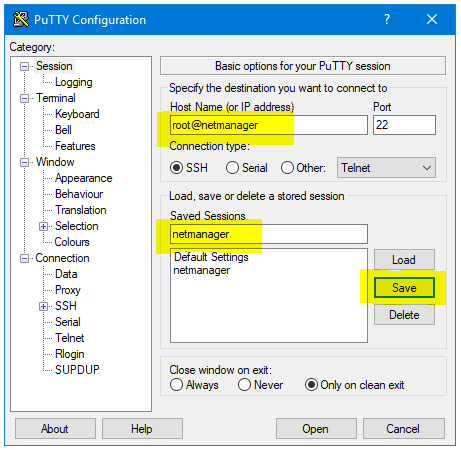
Figure 6:Setting the host and saving the session
When you first connect with PuTTY, you will be shown the fingerprint of the server you are connecting to. This allows you to confirm that you are connecting to the correct server and not a malicious machine intercepting your traffic. If you are sure everything is correct, click on Accept.
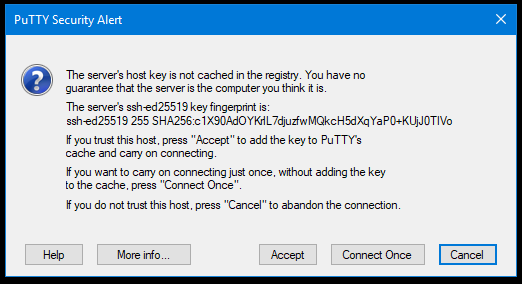
Figure 7:A warning will be shown the first time you connect
If you want to check that the fingerprint matches, go to the Security > SSH page in webadmin and compare the key fingerprint for displayed key type (ed25519 in this example) at the bottom of the page to those shown in the PuTTY warning.

Figure 8:Checking host keys on NetManager webadmin
Using the keys with WinSCP
- WinSCP can be downloaded here. We recommend picking the Explorer interface when asked
- Open WinSCP. The first time you run it, it will automatically open the Login box with New Site. You can always get back to the Login box by clicking on the New Tab button and clicking on New Site
- In the Login box with New Site selected, you can enter the hostname or IP address of the server in the Host name box
- Enter your user name in the User name box, but leave the Password box empty
- Click on Advanced... and then select SSH > Authentication section of the Advanced Site Settings window
- Click on the [...] button next to the box labelled Private key file and browse to the .ppk private key file you saved earlier
 Figure 9:WinSCP advanced authentication page
 - Click OK to close the advanced settings
- You can now click Login to connect or, better yet, save your configuration with the Save button to make it quicker to launch next time