


SAN-EasyTier
Jump To: Support > KB > IBM > SAN > EasyTier
Using Easy Tier Advisor tool on V3700
Installing Storage Tier Advisor Tool (STAT)
N.B. Current versions of Java, e.g. Version 8 Update 161 will not work. Please download an earlier version from Java SE 8 Archive Downloads. We have tested successfully with Version 8 Update 45
- Visit IBM Storage Tier Advisor Tool information and download page
- Click on HTTP next to the version description (e.g. STAT Tool version (STAT-9.3.0.2)) in the Download package section of the page:

- Agree to the terms
- Download the .iso file to download. At the time of writing this is STAT-9.3.0.2.iso
- If running on a VM or Windows 10, mount the .iso file using the usual methods. If using Windows 7:
- Download and install Pismo File Mount
- Right-click on the .iso file and choose PFM Mount...'
- On the Mount Options window, pick a drive letter from the Map drive menu and click Mount
- The installer will be in
\IMAGES\STAT\Disk1\InstData\NoVMand is called install.exe. N.B. If you wish copy this elsewhere to install, you must copy the whole of theDisk1folder, not just the installer. - Run the installer. If you see the error Could not find a valid Java virtual machine to load, install an older 32-bit version of Java from Java SE 8 Archive Downloads (We have tested successfully with Version 8 Update 45). If you see the error Windows error 2 while loading the Java VM, this means that the version of Java you have installed is too new.
- From within the installer, accept the licence agreement and pick all the defaults
Creating a report
- Create a folder called
STATat the top of your drive C (i.e.C:\STAT). You can, of course, pick another location, but these instruction will assume you are using C:\STAT - Log onto your SAN's web console and go to the support page (hover over cog icon at bottom and pick Support from the menu)
- Click on Show full log listing...
- Locate the latest heatmap files in /dumps/easytier. A week's worth of data is kept. They begin with
dpa_heatand include the date in YYMMDD format (e.g. 180316). Ignore any files in /dumps as they will be from an earlier firmware version. If you do not see any recent files, change node by clicking on the node menu on the top left and switching to the other one: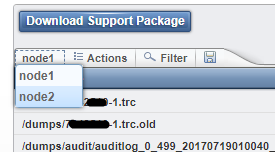
- Right-click on the chosen heatmap file and choose Download:
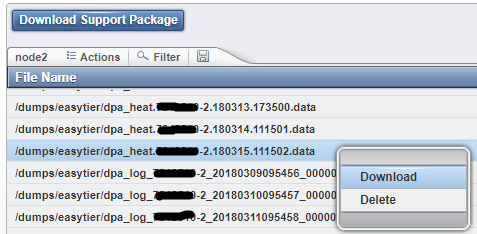
- Save the file to C:\STAT
- Open a command prompt and (assuming you are on 64-bit Windows) type:
cd "C:\Program Files (x86)\IBM\STAT" - Type
STAT -o C:\STAT C:\STAT\dpa_heat_xxxxxxx-n.YYMMDD.xxxxxx.dataand hit Return - You will see a message in a window saying
CMUA00019I The STAT.exe command has completed - You can now double-click C:\STAT\index.html to open the report in a web-browser
Analysing the report
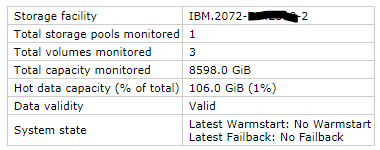
- At the top of the report is a summary which lists the amount of hot data:
- To get more detail, click on
P0storage pool ID in the table below the summary and then click on Volume Heat Distribution: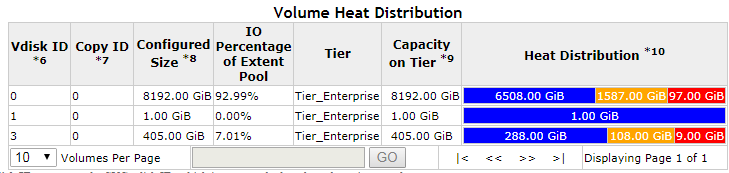
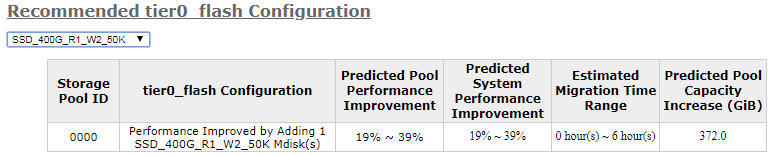
- To view recommendations, click on Recommended tier0_flash Configuration. You can then pick the size and RAID level of SSD from a drop-down to see the predicted performance improvement and capacity increase:
Retrieving heatmap data from the command line
The following is rather terse as it is more an aide memoire rather than a step by step guide
ssh superuser@san01lsdumps -prefix /dumps/easytier 1andlsdumps -prefix /dumps/easytier 2to look for which node has the latest file (2 in this case):IBM_Storwize:SAN:superuser>lsdumps -prefix /dumps/easytier 1 id filename [snip] 14 dpa_heat.xxxxxxx-1.170806.091354.data 15 dpa_log_xxxxxxx-1_20170806141353_00000172.xml.gz 16 dpa_log_xxxxxxx-1_20170805141358_00000171.xml.gz 17 dpa_heat.xxxxxxx-1.170807.091349.data IBM_Storwize:SAN:superuser>lsdumps -prefix /dumps/easytier 2 id filename [snip] 13 dpa_heat.xxxxxxx-2.180314.225506.data 14 dpa_log_xxxxxxx-2_20180315151507_00000028.xml.gz 15 dpa_log_xxxxxxx-2_20180314151505_00000027.xml.gz 16 dpa_heat.xxxxxxx-2.180315.225508.data
- Check that the latest file is on the current configuration node with
lsnodecanister:IBM_Storwize:FARLEIGHSAN:superuser>lsnodecanister id name UPS_serial_number WWNN status IO_group_id IO_group_name config_node UPS_unique_id 1 node1 500507680302AE58 online 0 io_grp0 no 2 node2 500507680302AE59 online 0 io_grp0 yes
- In this case, node 2 is the configuration node and has the latest heat file on it (if not
cpdumps -prefix /dumps/easytier/dpa_heat.node_name.date.time.data node_idto copy it). - Log out of ssh
- Use scp to copy the file:
scp superuser@san01:/dumps/easytier/dpa_heat.xxxxxxx-2.180315.225508.data .