Jump To: Support > KB > Windows > RecoveryPartition
Move, extend or delete recovery partition
Reference:
By default, the recovery partition is located at the end of the disk which will stop other partitions on the disk being extended if the underlying disk is increased in size (e.g. on a virtual machine). The default partition size of 500MB (on Windows Server 2022) can causes Windows Update errors such as 0x80070643 when installing updates such as KB5034439.
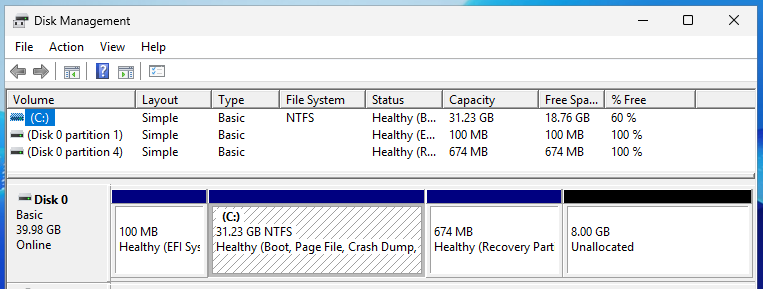
Below we can see that the disk has been extended from 32GB to 40GB, but the recovery partition means that drive C: cannot be extended into the unallocated space:
Step 1 - Resize disk
If you want to increase the size of your (virtual) disk, shut the VM down and resize it to your desired size.
Step 2 – Disable the active Windows Recovery Environment
At a command prompt run:reagentc /disable
Step 3 – Remove the existing recovery partition
- At a command prompt, run
diskpart - At the
diskpart>prompt typelist disk. Note the disk number (probably 0) and whether there is a * in the Gpt column - Type
select disk #where # is the disk number with the recovery partition (probablyselect disk 0) - Type
list partitionand note the recovery partition number (probably 4 based on a default full disk install) - Type
select partition #where # is the number of the recovery partition (probablyselect partition 4) - Type
delete partition overrideto delete the recovery partition
C:\Users\Administrator>diskpart

Microsoft DiskPart version 10.0.26100.1150

Copyright (C) Microsoft Corporation.
On computer: WIN-FHT4CL5LDEK

DISKPART> list disk

  Disk ###  Status         Size     Free     Dyn  Gpt
  --------  -------------  -------  -------  ---  ---
  Disk 0    Online           40 GB     8 GB        *

DISKPART> select disk 0

Disk 0 is now the selected disk.

DISKPART> list partition

  Partition ###  Type              Size     Offset
  -------------  ----------------  -------  -------
  Partition 1    System             100 MB  1024 KB
  Partition 2    Reserved            16 MB   101 MB
  Partition 3    Primary             31 GB   117 MB
  Partition 4    Recovery           674 MB    31 GB

DISKPART> select partition 4

Partition 4 is now the selected partition.

DISKPART> delete partition override

DiskPart successfully deleted the selected partition.
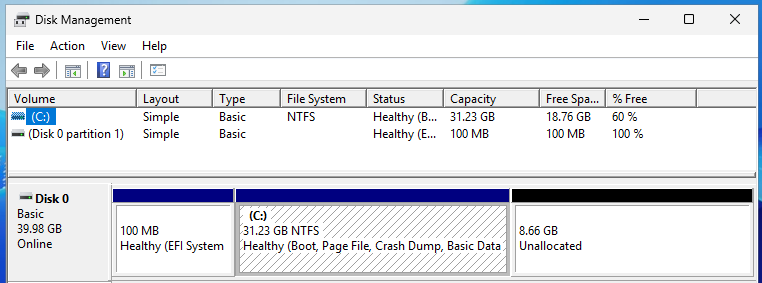
The recovery partition has now been deleted and there is nothing stopping drive C: from being extended:
Step 4 – Resize system partition and create a new recovery partition
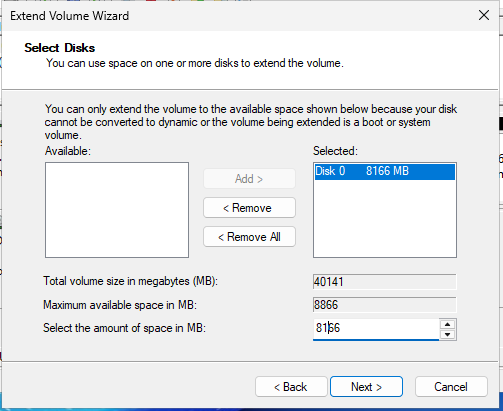
Once the existing recovery partition has been deleted you can extend drive C: as needed. Remember to allow space for the new recovery partition. It is easiest to do this using Disk Management. Here we see the Extend Volume Wizard showing that the final size has been manually reduced from the maxmimum of 8866MB to 8166MB (to allow 700MB for recovery partition):
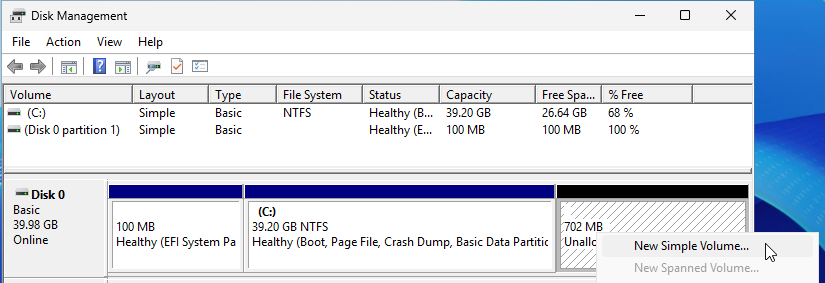
After drive C: has been extended, create a New Simple Volume in the Unallocated space. For Server 2022, it should be larger than 500MB. For Server 2025, it should be larger than 674MB:
- Do not assign a drive letter or drive path
- File system should be NTFS with the default allocation unit size
- A Volume label is not needed (you can remove New Volume)
Step 5 – Mark new partition as the recovery partition
- At a command prompt, run
diskpartagain (or if still open, select the disk again to be certainselect disk 0) - Type
list partitionand note the new partition number (likely to 4 again). You can also see this in Disk Management - Type
select partition #where # is the number of the new recovery partition - If your disk had * in the Gpt column, it has a GPT partition table and you should run:
set id=de94bba4-06d1-4d40-a16a-bfd50179d6ac
gpt attributes=0x8000000000000001
- If the disk did NOT have * in the Gpt column, it has an MBR partition table and you should run:
set id=27
Microsoft DiskPart version 10.0.26100.1150

Copyright (C) Microsoft Corporation.
On computer: WIN-FHT4CL5LDEK

DISKPART> list disk

  Disk ###  Status         Size     Free     Dyn  Gpt
  --------  -------------  -------  -------  ---  ---
  Disk 0    Online           40 GB     8 GB        *

DISKPART> select disk 0

Disk 0 is now the selected disk.

DISKPART> list partition

  Partition ###  Type              Size     Offset
  -------------  ----------------  -------  -------
  Partition 1    System             100 MB  1024 KB
  Partition 2    Reserved            16 MB   101 MB
  Partition 3    Primary             31 GB   117 MB
  Partition 4    Recovery           674 MB    31 GB

DISKPART> select partition 4

Partition 4 is now the selected partition.

DISKPART> delete partition override

DiskPart successfully deleted the selected partition.

DISKPART> list disk

  Disk ###  Status         Size     Free     Dyn  Gpt
  --------  -------------  -------  -------  ---  ---
* Disk 0    Online           40 GB  1024 KB        *

DISKPART> select disk 0

Disk 0 is now the selected disk.

DISKPART> list partition

  Partition ###  Type              Size     Offset
  -------------  ----------------  -------  -------
  Partition 1    System             100 MB  1024 KB
  Partition 2    Reserved            16 MB   101 MB
  Partition 3    Primary             39 GB   117 MB
  Partition 4    Primary            700 MB    39 GB

DISKPART> select partition 4

Partition 4 is now the selected partition.

DISKPART> set id=de94bba4-06d1-4d40-a16a-bfd50179d6ac

DiskPart successfully set the partition ID.

DISKPART> gpt attributes=0x8000000000000001

DiskPart successfully assigned the attributes to the selected GPT partition.

DISKPART> exit

Leaving DiskPart...
Step 6 – Re-enable the Windows Recovery Environment
Quit diskpart by typingexit. Back at the command prompt, Re-enable the Windows Recovery Environment by running:reagentc /enable


