HostName
Jump To: Support > KB > ThinIT > HostName
ThinIT hostnames
Each ThinIT machine should have its own unique name on the network. This name can be used to select printers and assign programs.
The name is determined in the following order (highest priority first):
- Local settings set in the Configuration tool
- Reverse DNS of the IP address (will tend to look like pc181)
- Use local MAC address to give a name like thin0123456789ab
This implies that if you see the latter two styles of names, then you've not set the name locally. As the name can be used when assigning Terminal Services Client Access Licences (TS CALs), the name should be set early on and be consistent.
Setting the hostname
- Depending on how the client is configured, you will either be presented with the blue or grey screen with ThinIT printed all over it (the default desktop) or your default application may launch automatically (e.g. connecting to Windows). You need to click the right mouse button on the default desktop to reveal a menu. If Windows has launched you will be presented with the Windows logon box. From here, click the Cancel button and when the logon window disappears briefly you will see the default desktop. Right click on the desktop and the menu will appear. Even if Windows re-launches, the menu will remain on top.:

- Choose Configure ThinIT from the menu.
- You will now be prompted for a password. By default, no password is set and you can just click OK. If this fails, your network manager should know what password has been set.
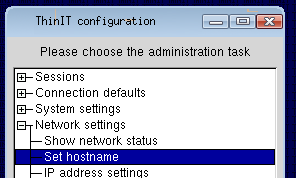
- Once logged in, expand the Network Settings menu by clicking on the + sign, then choose Set hostname and click OK:

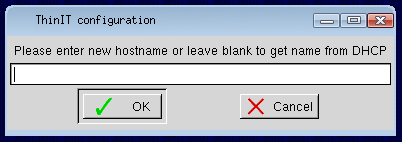
- Enter the desired name in the Please enter new hostname or leave blank to get name from DHCP box and click OK:

If you have any problems with this procedure or are unsure of the password set for your thin-client devices, please contact us.


