Jump To: Support > KB > IBM > ASU
Installing Feature-on-Demand (FoD) keys with ASU
Recent IBM server include an updated version of the IMM (IMM2). This comes in 3 different software levels:
- IMM2 Basic (included on x3100M4, x3200M4, x3250M4) - Basic monitoring, no web interface or CLI options
- IMM2 Standard (including on x3550M4, x3650M4) - As Basic, but includes web GUI and CLI interface (ssh, telnet)
- IMM2 Advanced (optional upgrade) - view screen, work with virtual media
To upgrade you need a Feature-on-Demand (FoD) key. Unfortunately, the documentation says how to install this using the web GUI or CLI. This is fine if you already have IMM2 Standard, but on an x3250M4 (for example), you cannot get the web GUI and hence cannot install the FoD key (but see below).
Obtaining key files
Note down your model types and serial numbers. Visit http://www.ibm.com/systems/x/fod/ and use the Request activation key link to request your keys. You will need to do a separate request for each machine. You will be emailed a series of .zip files. Extract the .key file (named like ibm_fod_0004_2583KDAB123_anyos_noarch.key) from each of these and save into a central location. Files starting with ibm_fod_0004 are upgrades to IMM2 Standard. Files starting with ibm_fod_0001 are upgrades to IMM2 Advanced. Note that the machine type (2583) and serial number (KDAD123) are embedded in the file name. Do not mix the files up!
Installing the keys from the IMM2 web GUI (IMM2 Basic)
With recent IMM2 firmware, you can upload the key file directly from the IMM web GUI even with IMM2 Basic. Therefore the recommended procedure is to update firmware before continuing.
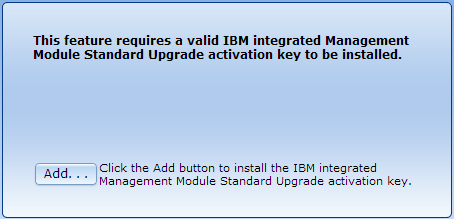
Ensure that the IMM network port (if present) or the first network port are connected to a network. Completely power-cycle the box and determine the IP address from your DHCP server (the IP address can be set statically from the uEFI settings, but this is beyond the scope of this document). Visit the IP address in a web-browser and you should see the following:

Once you have the key file(s), click on Add.., browse to the key file and upload it. You will then be presented with the standard IMM2 login screen and can login to add any further keys (see below).
Installing the keys from the IMM2 web GUI (IMM2 Standard)
Log into the IMM. Click on IMM Management menu and then pick Activation Key Management. Click on Add.. then browse and upload the key file. It will take effect immediately.
Installing the keys from an installed operating system
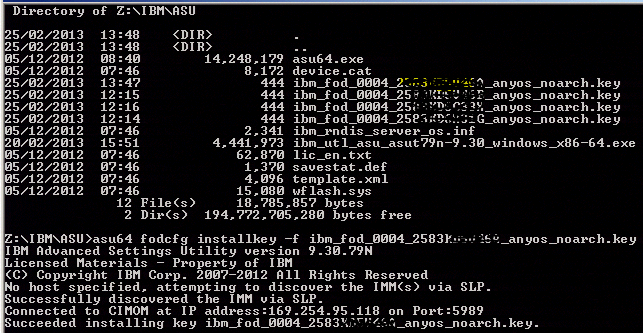
If you have Windows or Linux installed, download the Advanced Setting Utility (ASU) and extract all the files. In Windows, open up a command prompt and navigate to the location of the extracted files. It is helpful if the FoD files are in the same location. Run asu64 fodcfg installkey -f ibm_fod_0004_2583KDAB123_anyos_noarch.key (asu64 will be named differently if running on a 32-bit machine):
When installing this way, the updated IMM2 will be usable immediately through a web-browser.

Installing keys from the DSA
- In the root of your USB pendrive, create a folder called FoDKeys
- In the FoDKeys folder, create another one called something like MyKeys
- Put your FoD key(s) into the newly created subfolder on the USB pen drive
- Insert the USB pen drive into the server.
- Reboot the server and follow the guide to get into the DSA.
- Once in the GUI, click on the Features on Demand (FoD) link on the left.
- Keep IMM selected and click Next
- Select Install activation key from removable media and click Next
- After a short while, you should be presented with a table with the key files listed and tickbox next to each
- As the filenames have the serial number embedded in them, pick the right file for the machine you are on by ticking the relevant box and click Next
- All being well, the file should be installed successfully:

- Click Finish
- You can check the feature is installed correctly by choosing View active installation key from the FoD IMM menu (step 8 above):


